
従来はUnityでMetaQuest向けのコンテンツ開発を行う一つの手法として、「Oculus Integration」というSDKが使用されてきました。
ですが現在こちらは非推奨となっており、2023年11月に後継である「Meta XR SDK」が正式公開されました。
今回はこの「Meta XR SDK」を用いてVR空間内でのスティック移動や回転、テレポート機能の実装を試しました。
本記事の最終的な動作は、VR空間内で左コントローラーのジョイスティックを各方向へ傾けると前後左右に移動、右コントローラーのジョイスティックを左右に傾けると左右へのスナップ回転、上に傾けて離すとテレポート移動することが可能となります。


Meta XR SDK のインポート
- ブラウザからUnityAssetStoreの「Meta XR All-in-One SDK」ページを開き、「Add to My Assets」ボタンを押下します。
Meta XR SDKは機能ごとにSDKが分けられており、必要に応じて各SDKをインポートする形式となっていますが、今回は全機能が入っている「All-in-One」を選択しました。
- Unityで新しい3Dプロジェクトを作成し、メニューバーから「Window > Package Manager」を選択します。
- 開いたPackage Manager画面左上のPackagesプルダウンから「My Assets」を選択し、リストから「Meta XR All-in-One SDK」を選択して、「Import」ボタンを押下します。
Import Unity Packageダイアログが表示されたら、そのまま「Import」ボタンを押下してインポートします。


OVRPlayerControllerの設定
- 先にHierarchyウインドウの「Main Camera」オブジェクトは不要なため削除します。
またVR空間内で動き回るための足場が必要なので、オブジェクトを下記の設定でHierarchyに追加します。
配置するオブジェクト
Hierarchyウインドウ上で右クリック「3D Object > Cube」
値の変更1
オブジェクト名変更:Cube → Floor
値の変更2
コンポーネント:Transform
Position:0, -0.5, 0
Scale:100, 1, 100
- 下記の「OVRPlayerController」PrefabをHierarchyに配置します。
配置するオブジェクト
Packages > Meta XR Core SDK > Prefabs > OVRPlayerController

- 今回は地面の位置を原点として開発を行いたいので、下記の通り対象の値を変更します。
値の変更
対象オブジェクト:OVRPlayerController > OVRCameraRig
対象コンポーネント:OVRManager
Tracking Origin Type:Floor Level
- 現在の状態だとVR空間内でコントローラーの位置が分からないため、表示させるためにProjectウインドウ内のPrefabを左右2ヶ所の指定場所に配置して、値を変更します。
配置するオブジェクト
Packages > Meta XR Core SDK > Prefabs > OVRControllerPrefab
配置する場所
OVRPlayerController > OVRCameraRig > TrackingSpace > LeftHandAnchor > LeftControllerAnchor
OVRPlayerController > OVRCameraRig > TrackingSpace > RightHandAnchor > RightControllerAnchor
値の変更
対象オブジェクト:OVRControllerPrefab
対象コンポーネント:OVRControllerHelper
Controller:L Touch(LeftControllerAnchor側)、R Touch(RightControllerAnchor側)


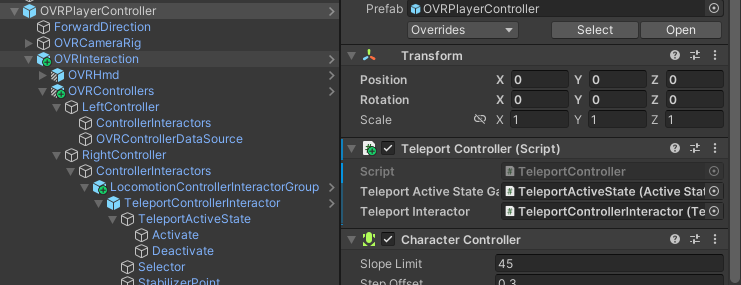
テレポートの設定(プレイヤー側)
- テレポートのために必要となる根幹のオブジェクトを下記の通りに配置します。
配置するオブジェクト
Packages > Meta XR Interraction SDK OVR Integration > Runtime > Prefabs > OVRInteraction
配置する場所
OVRPlayerController
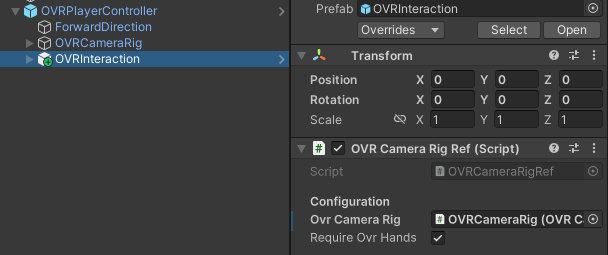
- 1で配置した「OVRInteraction」内の項目に、指定オブジェクトの設定を行います。
指定するオブジェクト
OVRPlayerController > OVRCameraRig
指定する場所
対象オブジェクト:OVRInteraction
対象コンポーネント:OVRCameraRigRef
対象項目:OvrCameraRig
- 1で配置した「OVRInteraction」の子オブジェクトとして、下記を配置します。
配置するオブジェクト
Packages > Meta XR Interraction SDK OVR Integration > Runtime > Prefabs > OVRControllers
配置する場所
1の配置オブジェクト
- 「OVRControllers」にもVR空間内でのコントローラー表示機能が含まれていますが、OVRPlayerControllerの設定でコントローラーの表示は行ってしまっているので、下記の不要なオブジェクトを削除します。
削除するオブジェクト
OVRPlayerController > OVRInteraction > OVRControllers > LeftController > OVRControllerVisual
OVRPlayerController > OVRInteraction > OVRControllers > RightController > OVRControllerVisual

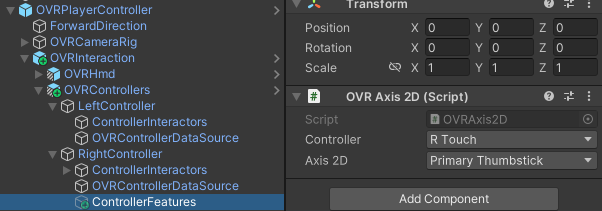
- 今回は右コントローラーのジョイスティックを上に傾けた際にテレポート機能を動作させたいので、新規で空オブジェクトを作成後に「OVRAxis2D」コンポーネントをアタッチして、下記の通り設定を行います。
配置するオブジェクト
空オブジェクトを作成(名前:ControllerFeatures)
配置する場所
OVRPlayerController > OVRInteraction > OVRControllers > RightController
アタッチするコンポーネント
OVRAxis2D
値の変更
Controller:R Touch
Axis 2D:Primary Thumbstick
- 更に下記のPrefabも配置します。
配置するオブジェクト
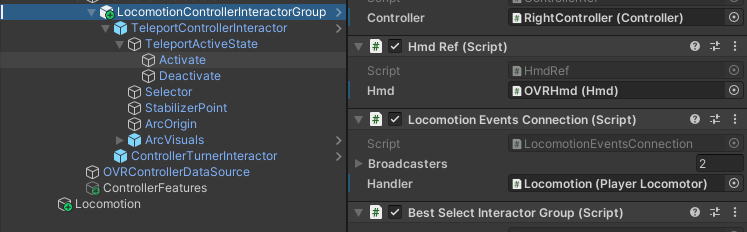
Packages > Meta XR Interraction SDK > Runtime > Prefabs > Locomotion > LocomotionControllerInteractorGroup
配置する場所
OVRPlayerController > OVRInteraction > OVRControllers > RightController > ControllerInteractors
- 5で追加した「ControllerFeatures」を、6で配置した「LocomotionControllerInteractorGroup」以下の下記コンポーネントに全て設定します。
指定するオブジェクト
5の配置場所 > ControllerFeatures
指定する場所1
対象オブジェクト:6の配置オブジェクト > ControllerTurnerInteractor
対象コンポーネント:LocomotionAxisTurnerInteractor
対象項目:Axis2D
指定する場所2
対象オブジェクト:6の配置オブジェクト > TeleportControllerInteractor > Selector
対象コンポーネント:Axis2DActiveState
対象項目:InputAxis
指定する場所3
対象オブジェクト:6の配置オブジェクト > TeleportControllerInteractor > TeleportActiveState > Activate
対象コンポーネント:Axis2DActiveState
対象項目:InputAxis
指定する場所4
対象オブジェクト:6の配置オブジェクト > TeleportControllerInteractor > TeleportActiveState > Deactivate
対象コンポーネント:Axis2DActiveState
対象項目:InputAxis


-
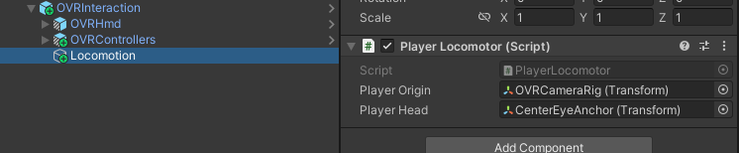
1で追加した「OVRInteraction」に新規で空オブジェクトを追加後、「PlayerLocomotor」コンポーネントをアタッチして各項目にオブジェクトを指定します。
配置するオブジェクト
空オブジェクトを作成(名前:Locomotion)
配置する場所
1の配置オブジェクト
アタッチするコンポーネント
PlayerLocomotor
指定する場所1
指定オブジェクト:OVRPlayerController > OVRCameraRig
対象項目:PlayerOrigin
指定する場所2
指定オブジェクト:OVRPlayerController > OVRCameraRig > TrackingSpace > CenterEyeAnchor
対象項目:PlayerHead
-
6で配置した「LocomotionControllerInteractorGroup」に、8で追加した「Locomotion」を下記の通り指定します。
指定するオブジェクト
8の配置オブジェクト
指定する場所
対象オブジェクト:6の配置オブジェクト
対象コンポーネント:LocomotionEventsConnection
対象項目:Handler
-
このままでも動きはするのですが「OVRCameraRig」だけが移動して「OVRPlayerController」がその場に取り残されてしまうので、こちらはスクリプトで制御する必要があります。
今回はそちらのスクリプトを用意しましたので、下記からダウンロードします。
TeleportController.cs
- ダウンロードした「TeleportController」を「OVRPlayerController」にアタッチして下記の通り設定します。
アタッチするオブジェクト
OVRPlayerController
指定する場所1
指定オブジェクト:6の配置オブジェクト > TeleportControllerInteractor > TeleportActiveState
対象項目:TeleportActiveStateGate
指定する場所2
指定オブジェクト:6の配置オブジェクト > TeleportControllerInteractor
対象項目:TeleportInteractor

テレポートの設定(ロケーション側)
- テレポートの設定にはテレポートする対象だけではなく、テレポート可能な範囲の設定も必要となります。
今回はテレポート可能な範囲を設定するオブジェクトとして、足場として作成した「Floor」に下記コンポーネントをアタッチします。
対象オブジェクト
Floor
アタッチするコンポーネント
NavMeshSurface(同名のコンポーネントが2つありますが両方)
TeleportInteractable
ReticleDataTeleport
-
1でアタッチした「TeleportInteractable」コンポーネントに下記を設定します。
指定するオブジェクト
Floor
指定する場所
対象オブジェクト:Floor
対象コンポーネント:TeleportInteractable
対象項目:Surface
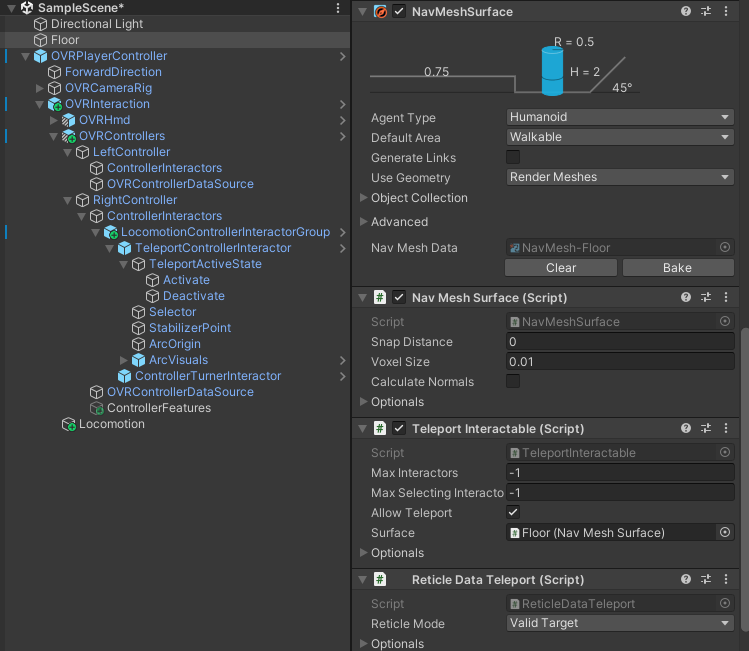
- 最後に1でアタッチした「NavMeshSurface」コンポーネントの「NavMeshData」欄にある、「Bake」ボタンを押下すると自動でテレポート可能な範囲が生成されます。
こちらはSceneビュー上に水色で表示され、目視確認が可能となります。


全ての設定が完了後、Questで動作させることで左コントローラーのジョイスティックでの移動、右コントローラーのジョイスティック左右傾きでのスナップ回転、上傾きでのテレポート移動が可能になっているかと思います。
また、現在Quest3の最新機能である「IOBT+GenerativeLegs」を導入し3Dアバターとの連携も検証中なので、次回実装方法についても記事にできればと考えています。

システムフレンドはXRの技術を利用し、楽しい「体験」を実現するための開発を行っています。
ご相談や事例の紹介など弊社のエンジニアがフレンドリーに対応させていただきます。
お気軽にお問い合わせください。
